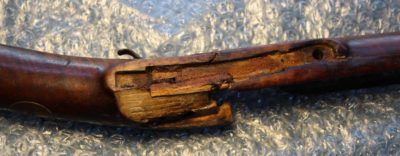
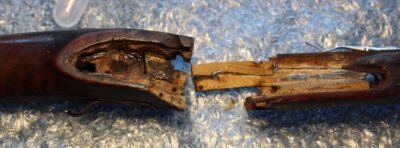
Once Tim got all the metal parts removed from the rifle I was able to take a good look at what was inside. It was pretty much what I expected, based on my observations from the outside. The narrowest part of the rifle stock is also the region of the greatest stress from the explosion and reaction of the gunpowder igniting and expulsion of the heavy lead bullet. And when the material used for said stock is curly or highly figured there is a lot of end grain/short grain structure, so failure is a given.
I could see immediately that the break was all the way through the narrow neck, and the only thing even holding it halfway was the inlet repair from days gone past (this picture was taken prior to the removal of the barrel). Even this repair was loose and shattered. At the very least, “the structural integrity was compromised,” as we say in our reports. As a matter of fact there were pieces already so loose that they were coming off n my bare hands.

There was no doubt that a complete disassembly was called for.
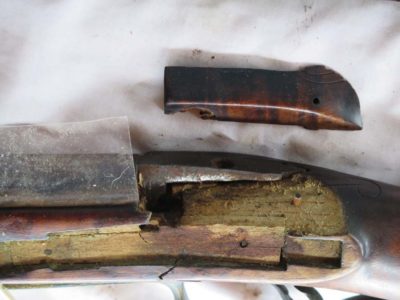
The initial “disassembly” was auto-started as one major piece came off without any help from me. It popped off when the barrel was detached in the initial disassembly.
My first step was to remove the inset repair that was the last thing holding the rifle together. I poultice the area with water and 1% surfactant to soften the glue holding it all together.

No sooner was that accomplished than the entire thing came apart. I now had direct access to all the gluing margins (and the glued that had been slathered/poured on in a previous restoration campaign).
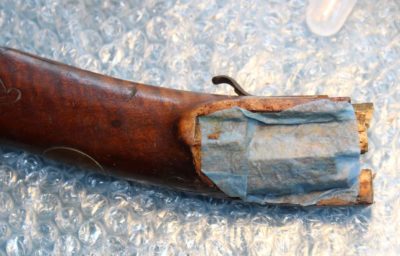
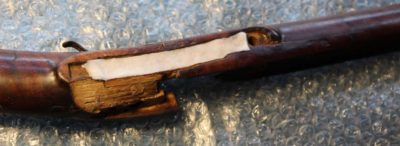
I poulticed and cleaned every surface I could get to, softening the glue and scraping it off with one of my home-made ivory tools, followed by swabbing with distilled water to get them squeaky clean.
I let eveything sit for a couple weeks to reach moisture equilibrium before beginning the reconstruction.
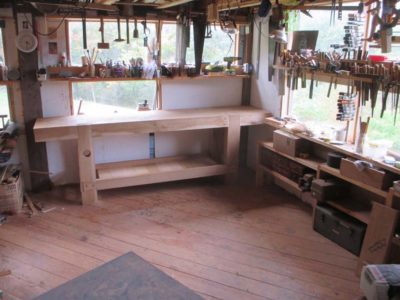
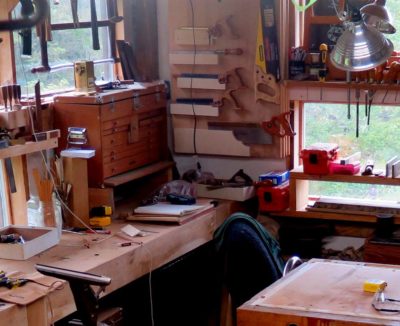
Usually I find that hindsight is somewhere in the range of 20/20. When I moved my FORP bench into the studio I though I had the perfect location for it. It sure looked great there, at least until the space got put back together.
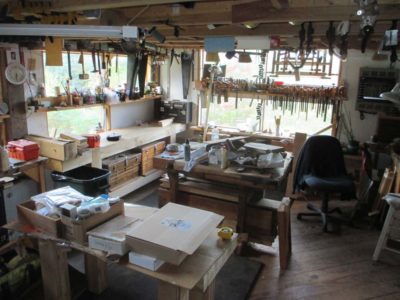
After almost two years of using it there I have become less enamored with the situation.

For starters I rely more on my original small torsion box bench more than anything else, in great part because of the vises already up and running on it. The spatial relationship between my favorite bench and the FORP bench has precluded my finishing and installing the leg vise on the FORP, knowing that if I did install the leg vise the tight quarters would result in me cracking my knee on a regular occasion, resulting in improper verbal outbursts.

After cogitating on the issue for several months I recalled how much I enjoyed having my first Roubo bench in front of the eastern windows before I moved it to the finishing station twenty feet away.
Now I think I know what to do.
Of the inventory in the finished Japanese tool box there are several instances of absence. Over the next several days/weeks/months/years I expect to acquire or fabricate the following for inclusion:
mortise gauge(s)
panel gauge
straight edge/winding sticks
layout square(s)
saw sharpening vise
plane setting hammer
bigger hammer
even bigger hammer
mallet
Many of these additions will be housed on the underside of the lid, the only place they could fit. I will chronicle each of the fabrication projects here along with at least two planing boards.
One of the tools ubiquitous in most work setting is a pair of scissors. Less common in a woodworking shop is a good pair of scissors. Thanks to the evangelism of my pal Mike the upholsterer (thanks Mike!) I am always on the lookout for a good pair of scissors to add to the shop toolkit. He has about 42 bazillion pair of scissors, each in top condition.
When I take note, it is surprising how often I grab for a good pair of vintage scissors to cut out patterns, make shims, or what not.

While at PATINA a couple months ago I was browsing through the tailgating flea market prior to the program and found a sweet, heavyweight pair in extremely good condition ($5 IIRC). Once I got them in the shop and cleaned up they did not even need sharpening or adjusting. The blades are six inches long and the action is smooth.
These scissors cut fabric, paper, cork sheet, leather, and lightweight carboard without breaking a sweat, and commercial veneers almost as easily (I use the veneers for shims, mostly). Best of all is they do not take up much space.
So be on the lookout for similar tools for your shop and toss away the cheap scissors from the dollar store. You will be glad you did.
Disclaimer — I am not now and never have been an ophthalmologist or played one on television, nor did I stay in a Holiday Inn last night.
Last Saturday, while vacationing in Florida to celebrate my mother’s 103rd (!) birthday, Mrs. Barn and I spent most of the day and evening in the Emergency Room of the Bascom-Palmer Eye Clinic in Miami, perhaps the nation’s leading institution of its kind. The evening prior I had noticed a dramatic increase in “floaters” in my left (good) eye and during the night saw flashes of light also in that eye. These are almost dispositive indications that a retina is becoming detached, almost being the operative word, and my concerns were pretty stratospheric. Hence, the two hour drive to the clinic, the seven hour wait to see a doctor, and the two hour drive home.
Floaters are usually the tissue debris remaining from some physical disruption inside the eyeball. They can be as plain as a tiny speck that moves around as your eye moves, essentially not a speck “in your eye” but literally a speck inside your eye. I’ve had floaters of some sort virtually all of my life, but the number and size of this new batch had me concerned. I had a new floater that looked like a Klingon warship, another that looked like a spider web covering about 1/5 of my vison field, and a multitude of tiny floaters resembling a swarm of bees, all of them bouncing around as my eye moved. These last ones were the most concerning.
Floaters by themselves are not debilitating, but merely irritating as they are so spindly and translucent and do not disrupt vision in a meaningful way. If I was a sniper it would be a problem, for a woodworker not so much. But, I was experiencing a new type of floater I had never before seen, similar to a small cloud of fog moving around in the exact opposite motion as the particulate floaters. That was very bizarre and disconcerting. This (these?) were much like smudges on my eye glasses, only moving. The problem is probably exacerbated by the fact that I have preposterously luxuriant eyelashes, so most of the time I have eyelash tracks on the inside of my spectacles with the resultant blurring to my vision.
Combined with the flashes of light in my eye, I was in fact experiencing the symptoms they tell you accompany a detaching retina and to get to the hospital immediately, so we did. Having a base vision that is extremely myopic, about -12 prior to my LASIK, I was and reman at high risk for a detached retina. Two of my siblings have already experienced detached retinas so my spidey-sense is quite high when it comes to this.
When we finally did get to see a doctor the eyeball examination was very thorough, and I was complimented on my cooperativeness. And why not? I’ve undergone a similar examination perhaps 150 times over the years. I know where to put my head, how to hold open my eyes, when to blink, when not to blink, and to not be concerned about the tears coming out of seemingly every hole in my head. (Hey, according to BC/BS I’ve had 22 eye operations and been fully asleep for only one of them. When I put my head in the frame and am told to hold still while the doctor is closing in with a scalpel or a laser beam, I learned to hold still.) Although I am certain I have shoes older than the doctor who examined me, I am experienced enough to know that he did an excellent job.
The bottom line is that I was not undergoing a detached retina but instead a detached viscera. The viscera is the transparent protein gel that fills up the balloon that is your eyeball. With age and genetics for some fraction of the population that gel begins shrinking and eventually pulls away from the surface of the balloon, releasing a lot of tissue debris in the process. The phenomenon is accompanied by some flashing light in the field of vision. So, I was correct to be concerned but my self-diagnosis was incomplete, fortunately.
My “new normal” for that eye is the presence of a great number of distracting floaters that my brain will eventually learn to ignore. The cloudy regions, again not debilitating, are either the result of the changed optical properties of the viscera gel/retina interface or perhaps even the refractive index change in regions of the viscera itself, or they could be simply shadows of the floaters themselves. All I can do is wait and see.
I have an appointment with my brilliant ophthalmologist in Charlottesville in a couple weeks. It was a regularly scheduled appointment (I usually go four times a year), and after speaking to his post-doc yesterday I was assured that there was no immediate or urgent need for attendance. I will know more soon, but it looks like this is just another thing to get used to.
As for my right eye, there is pretty much no reason for optimism there. Two corneal transplants have failed to provide good vision, although I am told the “transplants look perfect.” Not from my side they don’t. Added to that was the subsequent cataract surgery resulted in a defective lens being implanted, so the vision in that eye is always distorted and hazy, like I am looking through a piece of plastic food wrap on a foggy day. On top of all that was my glaucoma was not attended in a timely or diligent manner after it was diagnosed and not treated properly until the damage was mostly done, so I’ve lost approximately half of my vision in that eye altogether.
Now I wait to get accustomed to my new normal.
When my daughters were very young they asked me what I thought Heaven would be like. I told them that for me it would be, in part, a realm where when I woke up, with my newly perfected body to fit this perfect place I could see the world around me perfectly.
I’ll stick with that.
About the same time I made the hanging wall “cabinet” for my Japanese tools I also made a similar cabinet for my hand saws. It is fair to say that the second iteration of the concept was every bit as successful as the first. I had this “cabinet” tucked into the corner above my Roubo bench. Once again the cabinet door was so large (24″ x 36″) that almost everything (well, mostly the Gerstner full of layout tools) blocked it from opening fully, thus inhibiting the access to the inside contents of a dozen mostly vintage carpenter’s saws. Plus, the combined inside depth was so shallow, ~4 inches, that I had to hang the saws flat inside, several to a peg. That got real old, real fast.
The only part of the set-up that I liked was the holstered fittings for my back saws, which kept them visible and accessible.
So I pulled out all the saws from the interior and abandoned the “cabinet” on the wall.
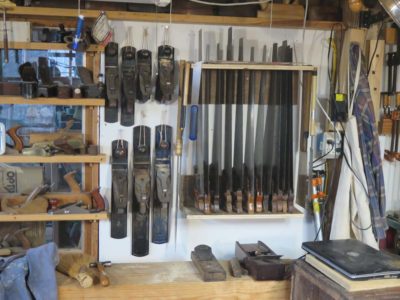
Pulling out some scrap plywood I made two shelves to hold saws, one slotted for the top and one plain shelf for the handles at the bottom. I attached these to the wall where my Japanese tool “cabinet” had resided previously. The fit and location seem perfect.
I use the sides of the top shelf to hang surplus Japanese saws, and that arrangement also works very well. I’m thinking that I will make a swinging panel on the front of the shelves to hang my back saws, but have not committed to that yet. I have a bit more spatial arranging to do in the studio space before I get to that point.
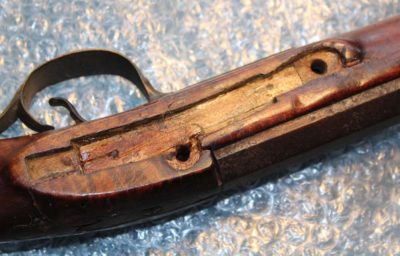
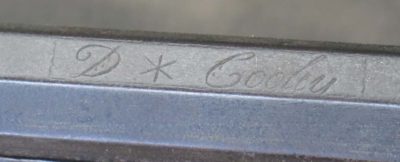
In looking back over the projects of last year I realize that I never recounted my revisiting the classic c.1810 western Pennsylvania long rifle, made by well-known gunsmith David Cooley. My previous effort was to simply stabilize it, but this time I got to dive in deep and repair it much more intensely. Once I got it apart it was clear it had been damaged and repaired several times.

Here are a few detailed images to remind you of the exquisite workmanship of the tool.
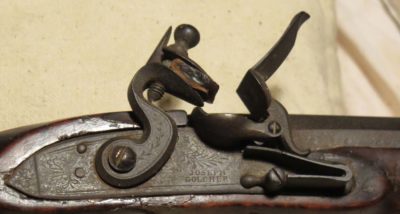
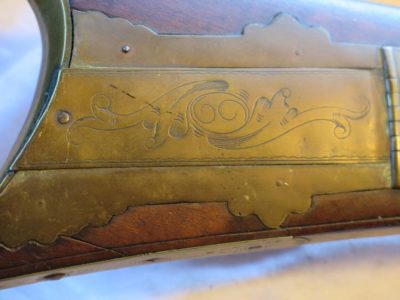

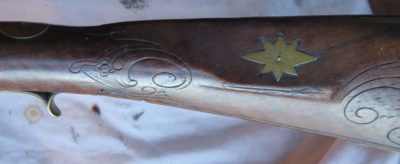
Over the coming posts you will get the tale of making it more intact, not enough to shoot but certainly enough to handle and exhibit safely. At issue was the through-and-through break running perpendicular to the length, right at the trigger mechanism.
Stay tuned.
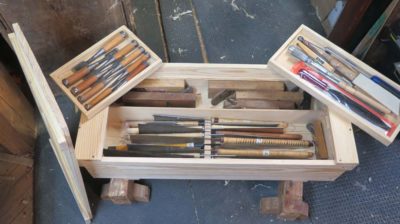
Rather than using the traditional tool rolls for any loose tools I decided to add two upper trays to the box interior. One was dedicated to by bench chisels, or at least as many of them as I could fit in there easily, and the other for anything left over.
The trays themselves were made using left over pine stick from the box-fabrication, thickessed to ~3/8,” with 1/4″ Baltic birch plywood bottoms, all glued and pinned with brads.
To support the trays, which sit over the planes and are slightly cantilevered over the saw till, I glued and tacked thin support battens on the box wall and a divider of the same height between the planes and the saws.
I am likely to mount a few tools to the underside of the lid, like the square and other layout tools, but for now I’m calling this a former “one of these days” projects.
When I was giving a recent presentation to the Richmond VA area MWTCA and RATS I was of course bound to browse the tool flea market and had some success. My pal John Davis has acquired a goodly supply of NOS files and rasps and I picked up a couple from him.

At about the same time I got a pair of Nicholson patternmaker’s rasps and a pile of handles from Highland Woodworking in Atlanta.
These are valuable additions to the tool kit, and all of them are high performance tools well worth the space and expense. I think the NOS files were a few dollars apiece, and the rasps were less than half the price of French ones and seem to be every bit as good,
I don’t mind working outside when it is cold, within reason, but I prefer to stay inside when it is cold and wet, as during a recent day. Since there was work to complete on the insides of the affected windows that was not a problem.
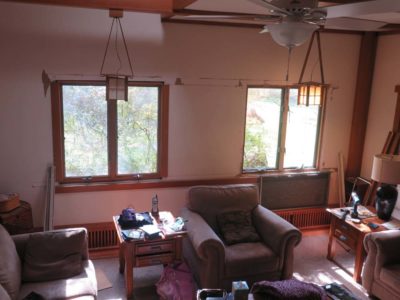
In the living room I had a fair bit of re-installation to complete, mostly because I originally selected a convoluted trim scheme thirty plus years ago. As a result I had to remove considerably more interior trim than would have otherwise been the case when I reconstructed the wall around the one window. Me and my affinity to G&G detailing with select vintage woods…
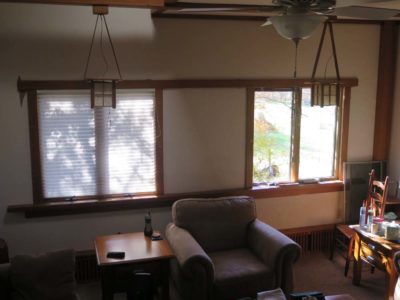
But, it all went back together just fine. A little patching and painting for the wallboard and it will be done.
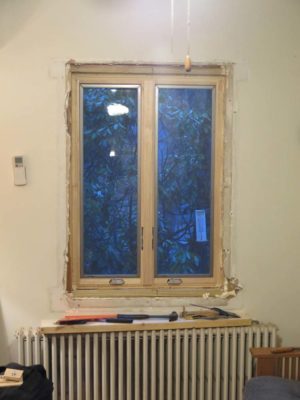
The window in the piano room was more involved as that interior trim was infested and I burned all of that, so I needed to make all new trim from vintage walnut. Which, fortunately, I have a fair bit.
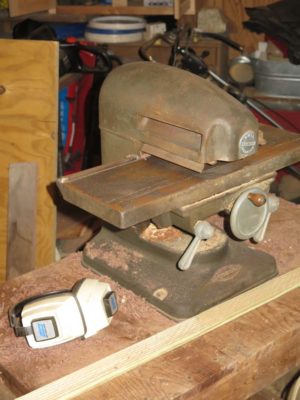
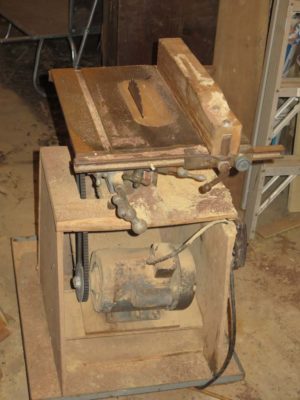
Since my larger machines are 225 miles away in the mountains I had to use these two old reliable beauties from the 1950s, my Craftsman version of the Williams & Hussey planer and the little Homecraft tilt-top beauty that was the American version (precursor?) of the classic Inca 8″ table saw. I have always really liked this little saw, and can see the time when I tart it up once it becomes my every-day workhorse in a smaller shop in the distant future.
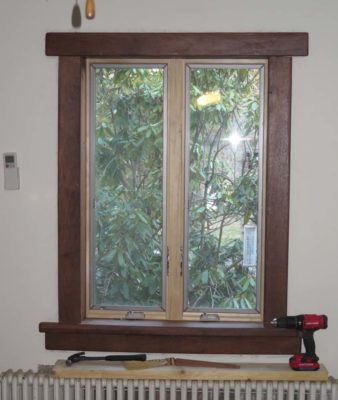
I sawed and thicknessed the boards on the machines then finished them off with hand planes in the basement workshop. Installed the new trim looks just like the old trim, which was the goal.

Recent Comments