
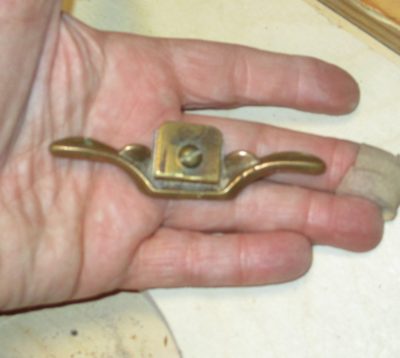
Recently while visiting our older daughter and her posse I snuck down to the basement workshop while the rest were up in the dining room playing board games (have some pity on Mrs. Barn, she loves board games and dancing, two activities for which I have near-zero proclivity), spending some time assembling sub-units of the tool cabinet parquetry. It’s an easy project I can take with me in a shoe box.
This parquetry topic will play an increasingly prominent role on the blog over the next year.
The work itself is fairly mindless, giving my attention plenty of opportunity to wander here and there. One of the ruminations it settled on was the numerous work spaces I inhabit, and the many sets of tools these places are populated with.
Of course there is my workshop in the barn, with its plethora of tools for woodworking and metal working.
That’s the first pile o’ tools.

Even in the barn there is the subset of tools up on the fourth floor where I build Gragg chairs. I created this space and its accoutrements after getting mighty tired of walking up and down stairs every time I needed this or that.
Thus, a second pile o’ tools.
Just down the hill from my main barn is the vintage log barn, originally a livestock housing but now a storage bin for lumber. Attached to this barn is the lean-to where all the lawn equipment is stored. And stored along with the equipment is the substantial collection of tools requisite for keeping things in operating order.
Third pile o’ tools.
Just across the creek from the lean-to is the cabin, and like almost every domicile it has a fairly extensive set of tools to keep everything there running smoothly, from electrical to plumbing to woodworking to who knows what else.
Fourth pile o’ tools.
Then we’ve got three vehicles, each with their necessary tool kits in case anything goes wrong while on the road.
Tool piles five, six, and seven.
Then there is the aforementioned workshop at my daughter’s house with fairly complete workshop in the basement (pile #8) and my carpentry tools and power machines in her little barn (#9).
Even though I do not have a workshop nor tool collection at my other daughter and son-in-law (he’s got an excellent inventory himself) I’ve got a couple selections of tools I take whenever we go there.
Piles 10 & 11.
Some might say I “have a tool problem,” I refute the accusation vigorously. I do not have “a tool problem,” I have a lot of tools.
Big difference.
For as long as I can remember I’ve been wearing carpenter pants with a side pocket (for a while my favorite jeans from Bailey’s had them on both sides!), into which fit perfectly the best little flashlights I ever used. These were machined aluminum case Ozark Trails flashlights, one of the proprietary brands from WalMart. The first crack in this edifice was when WM discontinued this particular line of flashlights in favor of lesser but presumably more profitable models. (I can only imagine Sam Walton spinning in his grave at the thought of what a malevolent entity his empire has become) The old ones were robust almost to the point of indestructability, a determination at which I arrived when I drove over one in my truck and it emerged functionally unscathed, although a little scratched. It took a lickin’ and kept on tickin’.

But then came the inexorable tyranny of, to quote the inestimable David Bowie, “F-f-f-fashion.” With the emergent ubiquity of “smart” phones (I think they have uses but on balance make the populace stoopider) the narrow confines of side pockets, originally configured for a folding carpenter’s rule, grew in size to accommodate these surveillance devices most American now carry. What, you thought their purpose was communication? Now, that’s funny!
Anyway, the newer larger side pockets were ill suited for my small flashlight as the flashlight just sorta wallowed around inside the bigger pockets, falling out whenever the opportunity arose. Like whenever I sat down in my recliner or in a car. I cannot recount the number of times I had to retrieve my flashlight from one of these locations.
This frustration led me to search for a new flashlight that fit the larger side pocket a little more better. There are lots of options on-line but I generally like to purchase items after I can examine them in person. Durning a recent trip to the hardware store I found a DieHard brand flashlight whose configuration fit the requirements perfectly. It was a bit more expensive than its predecessor, maybe, ($35 2023 dollars vs. $15 2005 dollars) but fit the new side pocket size perfectly and was touted as a better, brighter tool. I plunked down my money and started carrying it a couple months ago.
The real bolt-of-lightning occurred shortly thereafter, when I remembered just before bedtime that I maybe left the glue cooking on the coffee cup warmer and rather than fuss about it all night long I walked up to the barn to check it out (I had turned it off but had no clear memory of the event, a phenomenon that rears its ugly head periodically as I approach 70). As I headed up, then back down, I turned on the new flashlight and WOW I was accompanied by a wall of light in the rural darkness. My old flashlight was 150 lumens and the new one is 1000. Just wow.
The new flashlight also appears to be a solid aluminum case, but I’ll only be able to confirm its robustness when/if I drive over it and it keeps on tickin’.
My Every Day Carry inventory has now been upgraded.

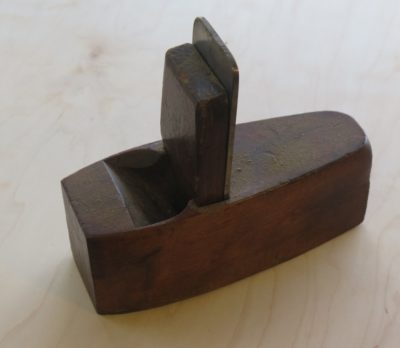
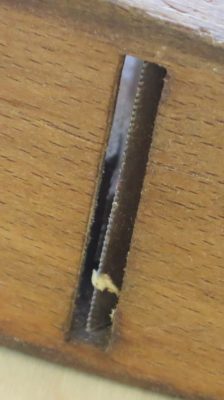
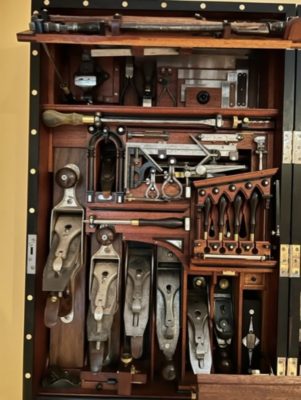
This third and final installment of “Near Miss” planes is an eccentric one revolving around the fact that I am not a chair maker. I am a Gragg Chair maker, a definite distinction. It might be a distinction without a difference, but it is a distinction. My only rationale for including this/these tools here is that indeed they are integral to that work but are probably not true panes. They are plane-ish. Yes, they have sharpened irons held inside a body but they are different enough to call their type into question. This/these tools are the micro spokeshave and its cousin, the drawspoon, sometimes called an inshave or scorp.
I was first introduce to the micro spokeshave in the foundry pattern shop when I started work there around 1978. At its core, when it came to the types of patterns we were often tasked with making, patternmaking was essentially no different than curvilinear sculpture. I was astounded the first time I watched the shop master John Kuzma lay waste to a glued-up stack-laminated helix that was to become the rib of a dredging cutterhead.
Almost hidden in his hand, this tiny tool soon had created a pile of shavings as the almost organic contour and surface took shape. While I had used “full sized” spokeshaves before, this little jewel was new to me and I have been a convert ever since. When I parted with the pattern shop in 1981 to marry Mrs. Barn and give college one final try — first college credits in 1972, tripe major degree finally in-hand in 1986 — John reluctantly bid me farewell (he could be an irascible sort but we got along famously; he came from the rough-and-tumble world of Cleveland factories and taught me obscenities and associated linguistic constructs that would make John McWhorter proud) he handed me as a farewell gift the micro spokeshave we had cast in the foundry. That tool remains one of my personal treasures.

The micro spokeshave we made in the foundry and John gave me as a farewell gift is the one in the upper right.
Flash forward to my first in-person encounter with a Gragg chair. Even underneath many coats of paint the processes and tools of Gragg were readily apparent, and a small spokeshave was integral to his work as well. Thus, when I started making replicas of his chair I was well equipped. Every curvilinear element of a Gragg chair is worked with this tool or one of its analogs (I own about two dozen micro spokeshaves and happily they are still being made)

The drawspoon on the left was made by AMT, and IIRC the one on the right by Ohio Tool. As far as I know neither is in production today. Perhaps the pinnacle of this form was made for a short while in Rhode Island by the Otner Bortner company. I am in the market for a set of those…
Another sorta cousin to the micro spokeshave to which I was introduced in the pattern shop was the drawspoon, used often in concert with the spokeshave. The spokeshave deals with the outer surface of a curvilinear shape, the drawspoon handled the inner curve. Unlike the shave, the spoon was restricted by its size and curvature so we had a set of them ranging from 1/4″ radius to 3″ radius. Try as I might I have never found another set like ours, perhaps not too surprising since we made them in the foundry ourselves. One of my great regrets ex poste is that I never copied the patterns for the shaves and spoons, and when I returned to visit the patternshop many years later all the tools and patterns of those tools were gone — rather than being a wood-based shop it was now a polymer-composite-based shop with body grinders replacing the woodworking tools.
Like the shave the spoon is plane-ish, but also like the micro shave it is integral to my working the seat deck of the Gragg chair. NB – I made a few modifications to Gragg’s original techniques and configuration, and introducing a modest swail to the seat deck with the spoon was one of them. That make the sitting ever more comfortable.
So, the micro-shave and the spoon are “near misses” in the Essential Planes menu only because they are plane-ish. If your work is different than mine these might not even appear on the radar, but in the context of my work they would be ranked #1A right behind the bench plane.
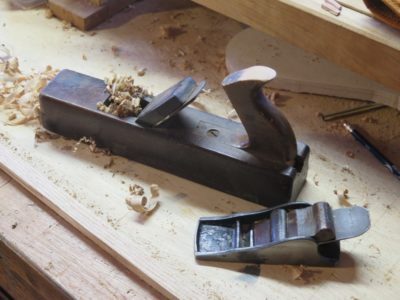
A second, most useful, “plane” that is adjacent to my Mount Rushmore of planes is the router. Hmm, is it really “a plane?”
Though primarily used for excavating, such as dados and rabbets (if I did more case-building it might be in that pantheon) but I find myself using it more than I would have thought when excavating areas for inlay or excavating joinery where my rabbet/dado plane will not work. I’ve even thought about getting one of the mini-routers now on the market, just for small inlay work.

I have two vintage routers, one “D” style and one platform style, both with no adjustments other that tapping and tightening screws. Both are tool swap/flea market finds, and I found both to be terrific tools so much that I had no problem finding a new home for my NOS Stanley router.

Once again, the only reason they are not ranked higher on my list is that I don’t do enough of the kind of work that makes them reside there. It’s not their fault I don’t have them in my Essential Planes.
Among the multitude of planes that I own and use, the five previously mentioned are my Pantheon. Three more planes are “near misses” for one of three reasons. First, even though the tool might be called “a plane” it might not really be a plane in the most common sense of the word, that being a tool to make lumber flat, smooth, true, to a specific dimension. Second, it might not be as integral to my own work, in other words my projects might not require this or that tool. If your projects do require this tool, wonderful. Finally, I wanted to make sure the Essential Planes were not gargantuan or heavyweight; my Pantheon are things that would be found in a reasonably-sized traveling tool box. Admittedly, these restrictions are idiosyncratic and almost arbitrary, but so be it.
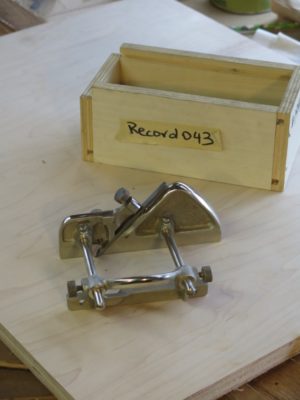
One of the tools in the “near miss” category is my sweet little #43 mini plow plane. Though technically a groove cutter rather than a stock prepping tool, it is called a plane in the lexicon so I will do so too. Were I more of a frame-and-panel sorta guy (I have recounted about how I am a premium plywood user for panel construction, even to the point of laying up my own custom veneer plywood) it would be right up there in the Mount Rushmore of planes. If you produce a lot of small boxes and furniture like RalphB over at The Accidental Woodworker it would be a perfect fit. The fact is I do not make much frame-and-panel work so this little beauty mostly sits on the shelf, patiently awaiting those few projects where it is an integral asset. If you do build a lot of frame-and-panel work, especially small to medium sized, this could easily be one of your two or three most important tools. I know that if I migrate in that direction, it will be for me too.
All that said, I do own two of these plow planes, one for the shelf in the shop and the other in my traveling tool kit; it breaks down to a very small package that fits into a #1 mailing envelope. You just never know when a frame-and-panel project will strike.
Up next – not a bird, not a plane, but for me a supertool!
When choosing “the essential planes” the sorting factors differ from person to person, and my selection definitely reflects my interests and projects. These three planes, combined with the previous pair, fulfills my needs for 99% of the work I do, and, as an added benefit, don’t weigh much or take up much space.
My final three Essential Planes are;
The scrub plane is simply part and parcel of my work in that they get rough wood flat (but not smooth) fast. I find myself using one more and more and the power planer/jointer less and less. A great part of that development is the nature of my projects — I make almost no large scale “cabinetry” — and the steeply cambered iron works wonders at getting things flat. Even on my large-scale projects, mostly workbenches, the scrub plane is a jewel when it comes to flattening gigantic slabs of wood that don’t even fit into the planer anyway.
I’ve got both metal bodied (LNT) and wooden horned scrub planes and use them interchangeably.
Next comes the toothing plane, perhaps peculiar to my work in that I do a lot of veneer work and laminations for which the toothing plane was designed. The serrated, or “toothed” iron is perfect for getting surfaces prepared perfectly for gluing together and there are regional techniques whereby all secondary surfaces are flattened quickly. Again, not smooth, but definitely flat. Admittedly I own far more toothers than I need (13) but you should have at least one and incorporate it into your work. It really increases production efficiency.

Finally is a plane probably in most of your tool kit, the rebate/dado plane. When it comes to making wide channels to fit pieces of wood together, or cleaning up the inside corners of joinery, nothing can compete with a rebate/dado plane. I would say that it is a tool perfectly designed to do one essential thing, but it is more than that. It is great for shooting moldings the Roubo/Bickford way.
Up next, three tools that may or may not be “planes” per se, and whose utility depends on my projects. If my work was a little different they, too, would be in the pantheon.
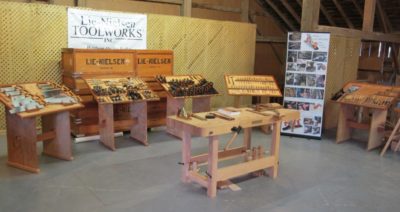
During the set-up for Handworks 2013 the weather was lovely (the bitter cold front moved in overnight as we were preparing for the Studley presentation), and my booth was tucked into a corner adjacent to the Lee Valley/Veritas mega-booth. Mrs. Barn wandered about the Festhalle before returning to cross paths with Robin Lee as his crew finished installing their scrumptious displays.
At one point she noted the walls of hand planes, and asked Robin, “How many planes do you really need?”
His answer? “How many planes are there?”
It could have not been more perfect had I scripted the exchange myself. She does not know exactly how many planes I own, but it is a lot, probaby a couple hundred by the time you count all the specialty planes
As I am simultaneously building my own tool cabinet and reviewing/winnowing my own shop contents, the question of “How many planes do you really need?” has been running through my mind a lot. I have come to the following conclusion, which I can state without fear since she does not read the blog — a lot fewer than I own. In fact, I believe I could engage in 95% of my own work with just two planes, a jack and a block.
I have a great many planes that would fit these descriptions and nearly every variation therein. But these two are my favorites, the ones I reach for more than any others. The jack plane is an ancient, high-mileage lignum vitae “shipwright’s” plane (I am an absolute sucker for vintage rosewood and lignum planes and own several), unmarked, simple in design, and outfitted with a slightly cambered iron I keep at a razor’s edge effortlessly. I find myself using this plane for hours at a time, especially when preparing stock for making Gragg chairs but truth be told it is my tool of choice for almost any stock-planing exercise. Yes, I have many longer, fancier and more noteworthy stock prep planes but given the nature of my work over the past and coming decades, this is the one for me.
My other favorite is this low-angled Excelsior sleigh bodied block plane that like the lignum jack was probably in a box lot of tools from an auction or flea market, the details of which are lost in the mists of time long past. I do recall it was a filthy mess when I finally retrieved it from the pile, but once I got it cleaned and tuned it is an absolute treasure. With a tap or two from the iron-setting hammer it can be hogging off material to make a softwood door fit its frame or remove gossamer hardwood shavings as it performs exquisitely as a smoother. Again, I have many smoother planes from renown makers and none surpass this little gem. It might in fact be one of the three favorite tools I own along with the ball peen hammer with the curly maple handle, a gift from my long-time consigliere MikeM, and the tiny brass spokeshave I made when working in the pattern shop 45 years ago. (Obviously, I am not including my Victorinox Spirit multitool; that is no mere shop tool, it is an essential component of daily life.)
I recall with amusement an exchange I had on a panel discussion with a famed furniture maker who snorted at the thought of incorporating a block plane into fine woodworking.
“A block plane has no place in a furniture makers tool kit, it is a carpenter’s tool,” he said.
I responded sotto voce with, “Well, if you need for me to help set one up for you, I will.” Normally a jovial sort he was none too happy with my comment. But then, he never met my sweet little Excelsior.
Up next, the three planes that round out my “Essential Planes” pantheon. With those five planes I am up to 99% of what I do.

If you follow this or any other woodworking blog you might already know that Handworks 2023 is on the calendar!
The event-to-end-all-woodworking-tool-events will be taking place the Friday and Saturday of Labor Day Weekend, and unless something catastrophic happens in the meantime I will be there in a booth with my trusty compatriot Ripplin’ John.

I’ll have plenty of my wares to sell — polissoirs, beeswax, shellac wax, videos, First Edition Roubo engravings, etc. — so I hope you will make the trip and stop on by. I think John can be persuaded to bring his Roubo Ripple Molding Machine.
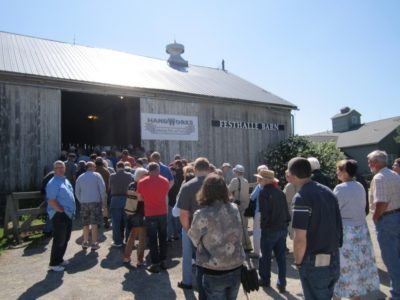

The event itself is the largest (to my knowledge) celebration of woodworking hand tools on this planet. Previous iterations of the event have garnered crowds of several thousand tool geeks from around the globe gawking and trying out (and buying) sublime tools. My own weakness is the booth of Slav the File Meister. I have yet to resist the temptation to enhance my inventory of files and rasps from amongst his dozen display tables of the new-old-stock wares he has for sale.
I know Amana has undergone some spatial reprogramming since the first Handworks ten years ago(!) so I’m not too sure what it will be like this year, but there will almost certainly be several venues scattered about through the tiny village.
See you in Amana!
When the Studley tool cabinet book came out eight (!) years ago I had two great mutually exclusive hopes. The first was that a new wealth of information about Studley would come flooding in. The second was that the research I and my collaborators unearthed was pretty much all there was knowable about H.O. It turned out the second was the correct one, in the intervening years not a single useful datum has come my way. Sigh. Or celebration.
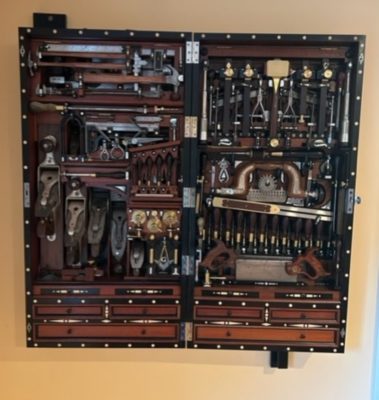
On the other hand, the interest in Studley’s tool cabinet and tools has grown to the point where replicas of his tools are being made and, even more impressively, replicas of his entire cabinet and its contents have been fabricated and assembled.
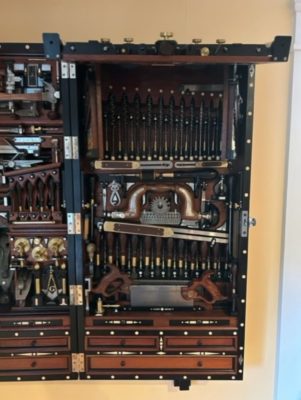
The latest of these is by Fred Armbruster, who intersected with my pal Ripplin’ John at a Rose Engine Lathe get together, and at John’s behest forwarded some photos of his own Studley creation. It is spectacular, as is Jim Moon’s recreation I wrote about in PopWood. Fred’s is every bit as deserving of praise and admiration, and I look forward to the time when I can see it in the flesh and shake his hand.
Well done, Fred. Simply magnificent!
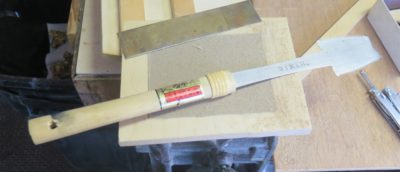
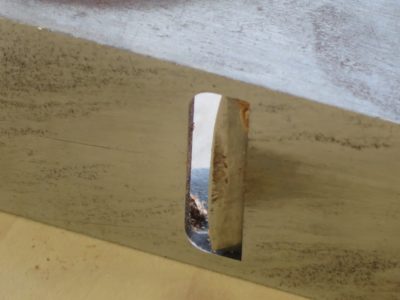
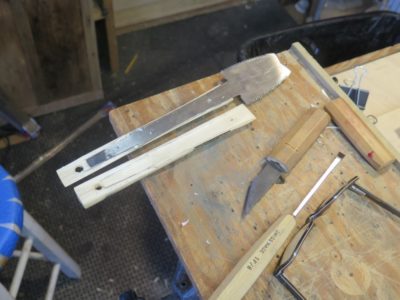
Remaking the Japanese mortising saw into a premium veneer saw was straightforward, but, as in the case of any instance where you must first break apart a perfectly functonal quality tool to do so, gave me pause. I thought about it long and hard, even going to the extreme of ordering a duplicate tool. In the unlikely case where the “remaking” went south I would still have the original capability.
The mortising saw business end did a great job at the cutting, but the long neck made the saw somewhat floppy and unwieldy for repeated and routine veneer work like the hundreds of cuts I will be making for the tool cabinet parquetry. Somehow that floppy neck had to be dispensed with. Once I settled on a simple strategy it was, like I said, straightforward.
I began by removing the bindings and set screw from the handle, which I then split along the blade tang with a sharp rap on a Sloyd knife.

The handle, being paulownia, cleaved instantly and cleanly, releasing the entirety of the metal blade.
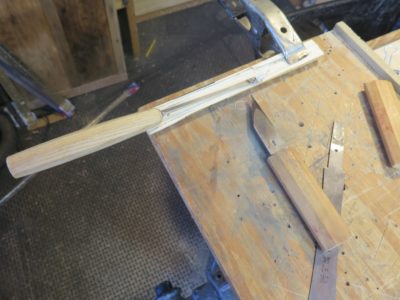
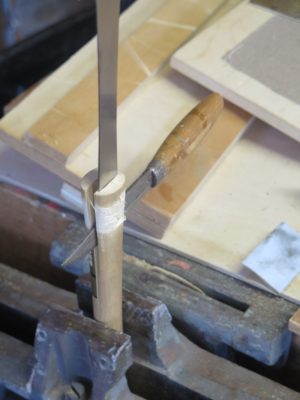
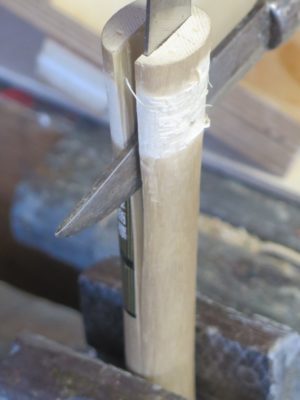
Re-housing the tang to “remove” most of the floppy neck was a piece of cake. Using the tang itself as the template I marked then excavated a pocket of the exact dimensions of it so the two halves of the handle could be reassembled to incorporate it. I cleaned the tang and abraded it lightly, then reassembled the unit in the new configuration with epoxy.

To hold things steady until the epoxy set I wrapped the handled with some elastic tape and left it for two days.
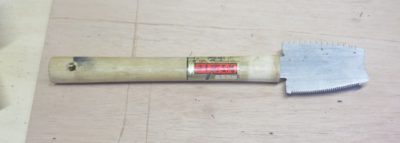
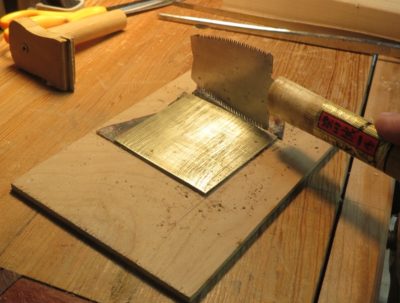
Removing the tape revealed a now-perfect parquetry cutting saw. Now all I need is a perfect set of sawing templates.
Stay tuned.

Recent Comments