Last month, for the first time in many years, I was able to offer an Introduction to Parquetry class at Joshua Farnsworth’s Wood and Shop near Charlottesville VA. We plan for me to offer the workshop again next year.
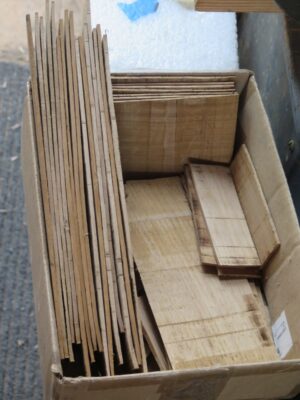
I had two exercises in mind for the students, all based on sawn veneer edge strips from boards.
The strips were then cut into identical 60-120-60-120 parallelogram “diamonds” or lozenges with a simple jig and a dovetail saw.
NB/ mea culpa – over the years I have attended and spoke at countless woodworking clubs and guilds, and invariably there is a show-n-tell session, and invariably they feature prominently some elaborate jig a member made to do this or that function. (Yes I know I used “invariably” twice in one sentence. That is a purposeful literary flourish.) In the old days I would just roll my eyes and tell myself, “That’s not woodworking.” Then we started the Roubo Transalation Project. Turns out the world of the ebeniste’ was all about jigs and patterns. To quote LBJ, “I reserve the right to be smarter than I used to be.”
Once the pile of lozenges got big enough, they laid out X and Y axes on a piece of paper to guide them then started assembling the composition by gluing down the lozenges to the paper with 135 gws hide glue.
Once the composition was large enough to cover the “field” of the substrate panel, in this case 1/2″ Baltic Birch plywood, the working face of the parquetry (ultimately the verso) was slathered with 192 gws hide glue, followed immediately by the face of the substrate panel.
Then the wo glued surfaces were brought together and clamped using another 1/2″ panel as the caul and a double layer of corrugated cardboard as a gasket.
After a very long while of not working on it I have resurrected the (very showy) decorative parquetry aspect of my mondo tool cabinet. I cannot recall exactly where I left it blog-wise and thus presume you don’t recall either. So, let me go back to the start and endeavor to keep the thread going better than before. Although with blizzards, greenhouses, and soon-to-be-three grandsons you never know. My goal is to post every week or so, walking you through my process step-by-step.
The short and sweet re-introduction is that I’m going to use a fancy parquetry composition, one inspired by the works of the Roentgens. Certainly not as fancy as theirs, and definitely not as well executed (they were perhaps the finest furniture-surface-decorators of their time, or maybe of all time [their pictorial marquetry is without parallel in my opinion]).
All of my base veneers were sawn from leftover chunks of white oak from the French Oak Roubo Project, so though the material is not literally contemporary with the Roentgens it does not miss it by much.
Depending on the piece and my mood (or weariness) I used both hand and machine sawing for the task.
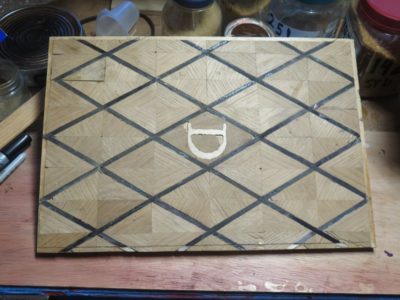
The parquetry pattern is a cluster of four 30-60-90 triangles assembled into both swirl and sunburst patterns into diamond shapes, to be used alternately in the final composition. An early sketch and proof of concept confirmed my vision for the cabinet.
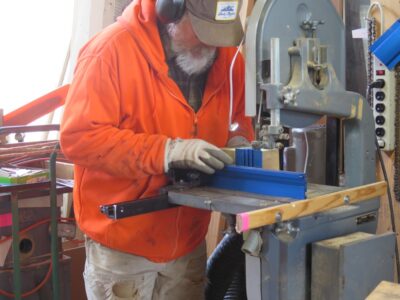
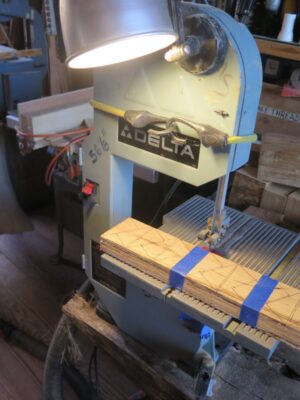
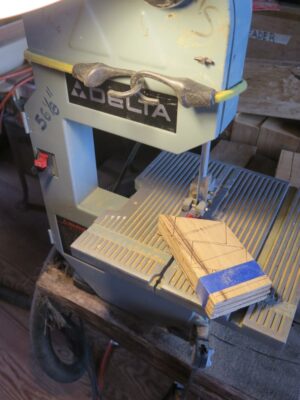
Once the veneers were cut into their ~1/8″ sheets I began sawing out the hundreds and hundreds of smaller triangles. These did not have to be particularly precise, and it was more efficient to deal with them ex poste and in the assembly process. So my little Delta bandsaw was the perfect tool to saw a stack of the veneers into the requisite triangles. Hundreds and hundreds of triangles.
At first I thought I would plane the edges of the triangles and created several jigs for that purpose. It turned out to be way more trouble than that was worth, trying to hold on to little pieces of really dense white oak, planing the skew edges. Did I mention that there were hundreds and hundreds of them to do?
I wound up taking a whole different approach, which will be the topic of the next post in this series.
As I approach the end of the year I am reflecting/projecting on the projects ahead of me. In addition to diving deeper into writing I’ve got a large number of things on my plate, including the mini-Gragg for Li’l T’s March birthday (coincidentally the month for the arrival of grandson #3, all of them March boys), outfitting my 18thC tool chest collection for on-site interpreting and re-enacting, doing some casting and patternwork, some possible private tutorials at the barn, several new workbench builds, blah, blah, blah.
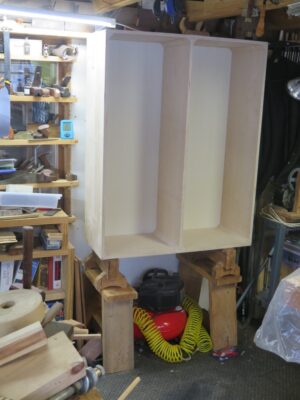
High on my list will be resuming work on my ultimate tool cabinet, the one that will take me along until my ashes are scattered on the mountain. Since the presentation surface of the cabinet will be parquetry in the fashion of the Roentgens, and made from scraps left over from the French Oak Roubo Project, I still have a lot of veneer to saw to complete that. I’ve written about that some, but it has been so long I will probably start the account all over again.
To enhance my veneer sawing I am thinking seriously about another upgrade to my bandsaw using the roller guide set from Carter.
Have any of you tried this product? If so, please let me know. It is not cheap, around $200, but if it works as well as they say I will plunk down the money without hesitation. Given the fact that I originally bought the saw for $100 at a yard sale, I can afford to tart it up a bit.
While undertaking some recent reorganization of my basement workshop in Elderbarndottir’s former house (she got married in November and moved to her husband’s house) I came across this nostalgic and beat-up picture from early 1977, hiding behind one of the shelving units. This French secretaire was my first really high-profile/high-value furniture restoration project at Schindler & Son of the Palm Beaches, where I started working in late 1974. Unfortunately I did not take any detailed pictures of projects at this point of my career – had this happened once I was a museum conservator the project would have been documented with hundreds of photographic images to go along with the written reports. I probably took a picture or two of the interior, it was spectacular. Bat that was almost 50years ago and cannot recall that detail.
Somewhere I have a picture of a Riesener cabinet from the same client, but that picture has not turned up yet.
Prior to this I did a lot of run-of-the-mill restoration for “ordinary” antiques along with a boatload of custom finishing and refinishing; before Schindler’s I was a “scratch and dent man” at a couple of furniture stores.
This project arrived in pieces in the back of Ambassador So-and-so’s Mercedes station wagon. The secretaire bore the inventory stamp of the Chateau de Saint Cloud. It should come as no surprise that the culture from which the word bureaucrat is derived should be punctilious about household inventories, but there you have it.
Over a period of a couple weeks, I reassembled it and made repairs to the rosewood and tulipwood veneers, then finally a couple of days of shellac pad polishing. “Pop” Schindler came almost every day to watch and guide me, it was on this project that he introduced me to hot hide glue.
This was a seed for my fascination with exquisite European furniture, especially of the French variety (along with our company’s work at the Wrightsman estate in Palm Beach and their furniture collection), and was truly the acorn from which my fascination with Roubo sprouted. It was also the prompting for me to embark down the career path of conservation; I entered that stream in 1981 at Winterthur Museum while I was a student in college.
Early on I had decided to incorporate demonstrations to the program at Handworks, and in order to have something on which to demonstrate I made a set of parquetry panels.
I’d begun these some weeks before, you can follow their development in my earlier post about Bandsaw Parquetry. One of the points I was trying to get across was the importance of surface preparation so I was going to start with some surfaces that REALLY needed preparations.
Finally, after two weeks of assembling stuff to go, two days of playing TETRAS loading, unloading, and reloading the truck full to the brim, off we were. After two long days of driving, we got to Cedar Rapids for a good night’s sleep before heading down to Amana for the Handworks set-up. I wish I could’ve said confidently that I prepped thoroughly and tied up all the loose ends but the odds were near 100% that several hours into the set-up or Handworks itself I would remember something I left behind.
John and I showed up bright and early for setting up, the building opened at 9AM and we were there around 9.15. I think we were the first booth to be completely set up
Here is a walk around the Festhalle during the set up time. Upcoming posts will document other spaces and activities for Handworks.
I was in my usual spot, on the center row near the Lie-Nielson booth up on the stage, and between Jeff Hamilton in front and Gary Blum to my rear, with Matt Bickford across the aisle on one side and Patrick Leach on the other. I took the picture of the main space from the stage, where L-N set up very late in the day. While they were working on their display Tom Lie-Nielson stopped by and we had a nice long chat.
My setup took only a couple hours, leaving lots of time to visit with friends from years past. I especially cherished the time with the Bickfords, folks who are definitely on my wavelength.
Across on aisle were Matt Bickford and a chairmaker I did not know (there were actually a lot of exhibitors and tool makers I did not know),
and across the other aisle was Patrick Leach’s seductive vintage tool emporium. Amazingly enough, I escaped the weekend without buying a single tool.
Immediately behind/adjacent to me was Gary Blum with his innovative workbenches and accessories, and hand planes.
Konrad Sauer was just down the way with his spectacularly high-performance planes,
then Lost Art Press. I think Gramercy Tools was between them but had not set up when I was walking about.
Benchcrafted was the booth greeting the visitors immediately on entry. It makes sense, they’re the ones who pulled the whole event together.
Back in the corner was innovative genius Jeff Miller who was showing off this device that hollowed out bowls. It was the coolest thing I saw at the event. Over his shoulders you can see the Lee Valley booth, but they had not begun setting up yet.
Rounding out the Festhalle setups from that time was Ron Brese, closest to Benchworks at the other end of the center row.
With the rest of the day free we had a chance to go visit all the other booths in the three other venues, although some of the booths were not ready until late in the day or even the next morning.
We were girding our loins for a wild couple of days starting at 10AM the next morning.
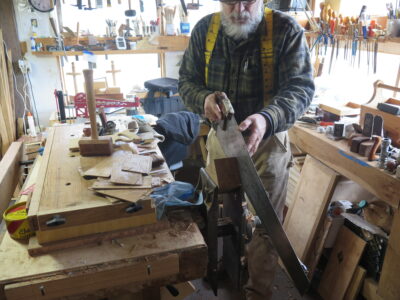
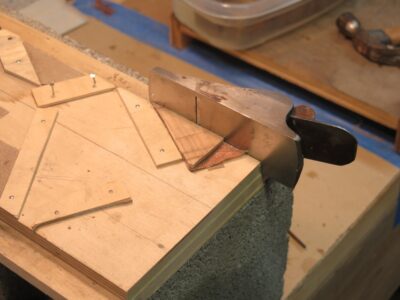
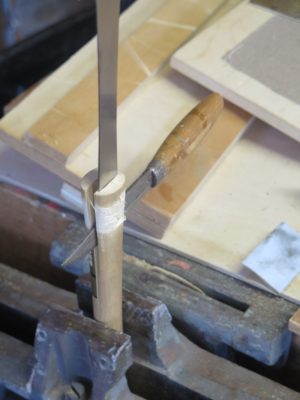
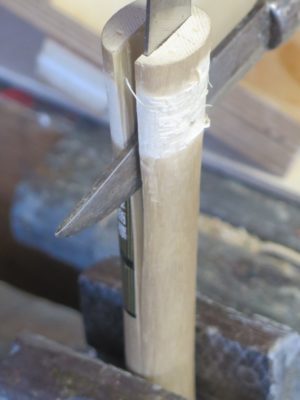
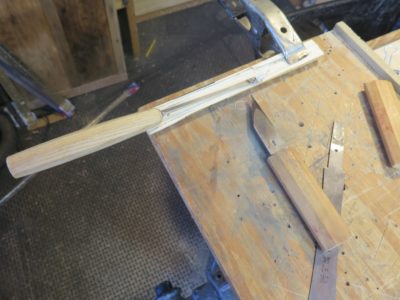
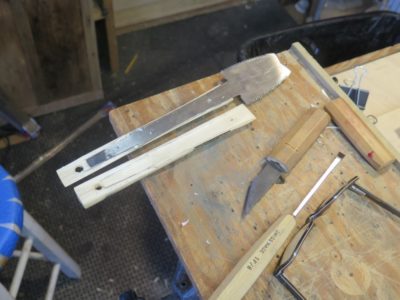
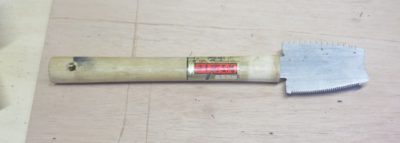
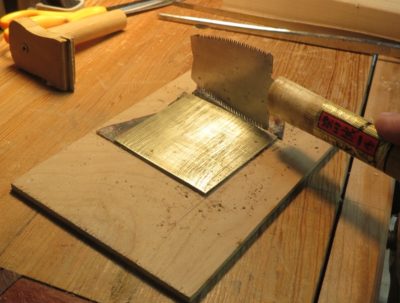
Remaking the Japanese mortising saw into a premium veneer saw was straightforward, but, as in the case of any instance where you must first break apart a perfectly functonal quality tool to do so, gave me pause. I thought about it long and hard, even going to the extreme of ordering a duplicate tool. In the unlikely case where the “remaking” went south I would still have the original capability.
The mortising saw business end did a great job at the cutting, but the long neck made the saw somewhat floppy and unwieldy for repeated and routine veneer work like the hundreds of cuts I will be making for the tool cabinet parquetry. Somehow that floppy neck had to be dispensed with. Once I settled on a simple strategy it was, like I said, straightforward.
I began by removing the bindings and set screw from the handle, which I then split along the blade tang with a sharp rap on a Sloyd knife.
The handle, being paulownia, cleaved instantly and cleanly, releasing the entirety of the metal blade.
Re-housing the tang to “remove” most of the floppy neck was a piece of cake. Using the tang itself as the template I marked then excavated a pocket of the exact dimensions of it so the two halves of the handle could be reassembled to incorporate it. I cleaned the tang and abraded it lightly, then reassembled the unit in the new configuration with epoxy.
To hold things steady until the epoxy set I wrapped the handled with some elastic tape and left it for two days.
Removing the tape revealed a now-perfect parquetry cutting saw. Now all I need is a perfect set of sawing templates.
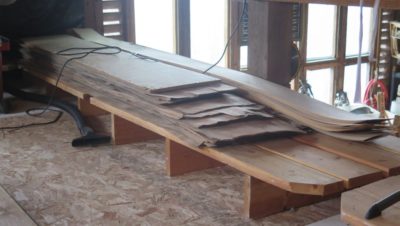
Over many years due to some fortuitous opportunities, including the generosity (?) of fellow woodworkers cleaning out their stashes of stuff, I have managed to acquire an awful lot of veneers. Those that are unusual or rare go one place in the barn, but the large majority is mundane and gets stacked on a pair of cot bases on the floor directly overhead of my studio space. There is nothing special about this pile of veneers other than the fact that for the most part this is vintage, heavier weight material than you would routinely find today. Most of it is in the range of 1/20″ to 1/30″, in poplar, walnut, maple, ash, cherry, and birch.
Even If I was manufacturing furniture, I would never use all this up.
So, what to do?
I’ve been contemplating making small, elegant boxes, mostly with either parquetry/marquetry or fuaxrushi presentation surfaces. Some of the boxes would be straightforward cubic shapes, others bombe’. What better foundation for these decorative techniques than ultra-high-quality veneer-core plywood? I have long believed that a static substrate of high-quality plywood is superior to a dynamic solid wood substrate with its inexorable rheological response to environmental moisture change. I could spend the big bucks to get marine or aircraft plywood, or I could just make my own.
So, I will. I have had excellent success in the past making small epoxy/veneer plywood panels for little projects and will now make that my SOP for fancy little jewel boxes. For larger pieces, say 12″ x 18″ or maybe a little larger, I will need to make a veneer press. For bombe’ panels I will need to construct forms and devise a vacuum press.
In the end, it is all just more fascinating stuff to do in the adventure that is life at the barn.
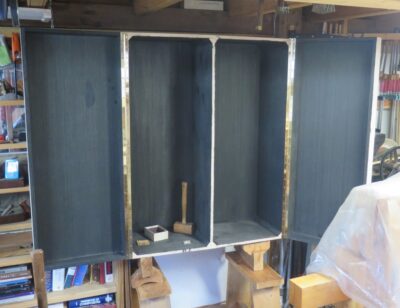
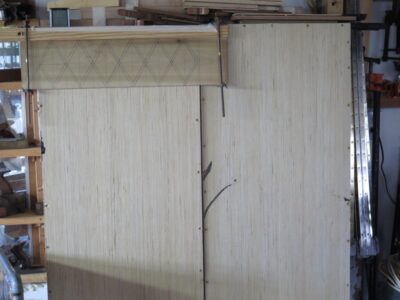
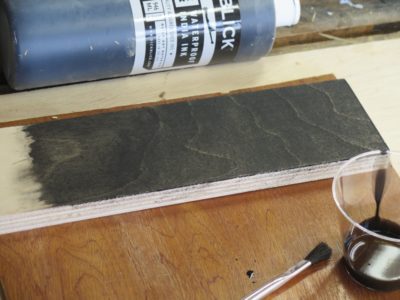
One of my initial design/aesthetic choices for the standing tool cabinet was to make the prominent detailing to be black, along with the entire interior. In the former case it was to set off the comparative blandness of the oak veneer, about which there will be exhaustive posting in coming weeks, and in the latter it would serve to set off the tools themselves. As to the ebonized stringing in between the parquetry I am not yet fully convinced — I may instead go with rosewood which will serve the primary purpose equally well, although it will not tie-in with the interior well without further design– but ebonized interior is already a fait accompli.
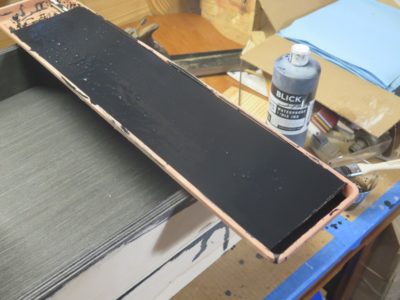
The ebonized stringing for the proof-of-concept parquetry exercise representing the outer skin began with a piece or two from the pile of 1/4″ tulip poplar I had on hand, itself a raw material for yet another proof-of-concept for some fauxrushi I am prototyping. Using water soluble shellac as my coloring medium, a/k/a India Ink, is a method I use frequently.
The big box store pieces of tulip poplar fit a flower pot tray perfectly, so I used the tray as the immersion bath for the board. After soaking it all night the surface was really black.
Even then when ripping the bards on the bandsaw it was apparent that the interiors were not well dyed, so I repeated the tray and India ink step again with the strips. The result was a pile of 1/4″ wide ebonized stringing strips. That might sound a tad wide to you but remember, the front presentation of the cabinet as 4-feet-by-3-feet.
As to the interior, I noted that the soaking of the plywood with India ink yielded a very desirable surface, black-ish but still retaining the character of wood, a result not really possible with something like gel stain or il paint.
Within view of the barn parking pad, where I process all my firewood, are two nice trees with mature burls. Those trees will likely suffer fatal injuries soon. Whether I make them into turnings or veneers waits to be seen. I’ve got lots of ideas for both options. One of my favorite pieces of furniture is Ruhlmann’s burl veneer cabinet with inlaid ivory bubbles. Hmmm. I’ve got a bunch of ivory, real and artificial, so…
This tree trunk is roughly a foot in diameter. The odd shape has me wondering how to saw up this one once I get it on the ground and in the shop.
This burl is almost a three-foot ball, so my creative glands are pumping out juices big time.
In addition to these two beauties, I’ve culled some very large forks from cutting up the big walnut tree we felled last year. Gotta be some outrageous crotch/flame grain inside them. I’m hoping to get up the mountain and harvest the firewood for winter 2023-2024 within the next month or two, and it would be a good time to process all of this stock.
One of the aspects of having a humungous Fortress of Solitude like the barn, four stories of 40′ x 36′ space, is that there are a multitude of nooks and crannies into which things can be tucked, stuffed, crammed, lost, and re-discovered. I call these instances my own “Clean Up Christmases,” when I come across treasures I had forgotten, or at least misremembered.
Such has been the case recently when prepping the classroom for this coming weekend workshop Historical Wood Finishing. As the first class there in over two years, the space had, shall we say, devolved. That pesky Second Law of Thermodynamics; they tried repealing it but it just didn’t take. It has taken me over two weeks to get it ready for the group on Saturday. The level of “rearrangeritis” (full credit to James “Stumpy Nubs” Hamilton for coining the phrase to describe an all-day travail when moving one thing in his crowded shop) has been monumental, and monumentally rewarding on several fronts. It has also given me time for contemplation about future projects, a topic I will address in numerous upcoming posts.
At the moment I am mostly reveling the rediscovery of two caches that were set aside for some future completion. The first is the two sets of brass Roubo-esque squares fabricated before and during that workshop more than two years ago; all it will take is a day or two with some files and Chris Vesper’s sublime reference square to get them up and running.
A second trove is the pile of French oak scraps from the multiple iterations of the FORP gatherings in southern Georgia. I brought them home in order to turn them into veneers, probably oyster shell style, to use on some as-yet-unknown project. That “unknown” identifier is becoming more “known” as the days go by. Then, much like my shop being the only one in the county with two c. 1680 parquetry flooring panels from the Palais Royale in Paris, my tool cabinet will be the only one with veneers from some c.1775 oak trees from the forests surrounding Versailles.
Who knows what other “Christmas” presents I might find during the never ending effort to impose order on my space? Stay tuned.


Recent Comments